This past weekend, we upgraded our Internet to a much faster Internet. We have been limping along with the service we had installed when we first moved out here, but our frustration levels were getting a wee out of control so we decided to make a change.
I am excited about the change, because it means that with more speed, I can now upload videos to my You tube channel much easier.
So I decided to do a test video yesterday, to see if there was any improvement.
There was - I was able to upload my video in less than 30 minutes.
Now I can proceed with my plan to make regular videos, featuring not only my crafts, but also my gardens and more importantly, to capture my progress of completely re-vamping the yard and gardens this year. I think it will be very helpful to be able to look back at my work on our property in the months, and maybe even the years to come.
So here is the little video I shot yesterday - it is only a little over 5 minutes long.
I hope you enjoy it, and don't forget to click to subscribe to my channel... it will always be commercial free - I promise!
https://youtu.be/rZocd1vhmjg
Tuesday, March 12, 2019

Monday, March 11, 2019
YUMMY MINESTRONE SOUP!
Good Monday morning to you all! It is a beautiful morning, quite mild, and finally a feeling of spring in the air has brought a spring to my step!
You all have been so patient, through the Blue jean series, that I thought I would give you a break today, and share a recipe that is fast becoming a favourite in my kitchen. I have made it twice now and each time it was great.
We love home made soups and I try and make some type of home made soup several times a month, if not more. I have a pot of turkey rice cooking this morning, and already the house is smelling so good!
This soup is a Crock-pot version, but I am sure you could adapt this to a regular stock pot, or whatever you prefer to use to make your soup in.
You still have time to make this up for supper tonight...
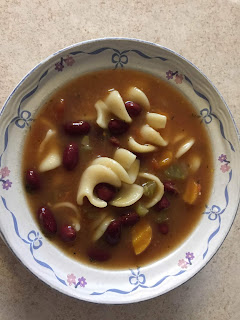
You all have been so patient, through the Blue jean series, that I thought I would give you a break today, and share a recipe that is fast becoming a favourite in my kitchen. I have made it twice now and each time it was great.
We love home made soups and I try and make some type of home made soup several times a month, if not more. I have a pot of turkey rice cooking this morning, and already the house is smelling so good!
This soup is a Crock-pot version, but I am sure you could adapt this to a regular stock pot, or whatever you prefer to use to make your soup in.
You still have time to make this up for supper tonight...

Zesty Minestrone
1/4 cup Kraft Zesty Italian Dressing
1 cup chopped onions ( 1 medium)
1/2 chopped celery ( 1 stalk) I used a couple.
1/2 cup chopped carrots ( I used more than a cup)
1 can 540 ml diced tomatoes, undrained
1 can 540 ml red kidney beans, drained and rinsed
2 cans 284 ml each vegetable broth... ( I used the Campbell veg broth in the boxes)
2 cups water
1 tsp Italian seasoning ( I used my own grown herbs - thyme, oregano,)
1-1/2 Cup small pasta shells, uncooked
1/2 Cup grated Parmesan Cheese
Heat dressing in a large nonstick skillet on med high heat. Add onions, celery and carrots, cook 2 minutes or until crisp - tender, stirring occasionally. Spoon into slow cooker. Add tomatoes with their liquid, the beans, broth, water and seasoning: stir and cover.
Cook on LOW for 6 hours ( or HIGH for 3 hours)
Stir in pasta and cook 10-15 minutes more or until pasta is tender. Serve and sprinkle with cheese.
These are great served with some biscuits, a cheese bun or a dark rye bread. Add a salad and you have a filling meal.
Enjoy!
Friday, March 8, 2019
I'M NOT DONE YET!
Just when you think you have exhausted any and all projects to do with old jeans - well - you find some more....
My friend Kate from the UK, makes these adorable little fabric boxes. Very simple to make, and very adorable. I had just the right amount of material, so I decided to make one for myself. So I made the template, and started cutting. I chose some old PJ's ( the legs) to use as a lining.

Kate has designed this little bling idea for one of the sides, so I tried it out, using some net, and some beads and sequins I had lying around... adorable.


My friend Kate from the UK, makes these adorable little fabric boxes. Very simple to make, and very adorable. I had just the right amount of material, so I decided to make one for myself. So I made the template, and started cutting. I chose some old PJ's ( the legs) to use as a lining.

Kate has designed this little bling idea for one of the sides, so I tried it out, using some net, and some beads and sequins I had lying around... adorable.

I appliqued a flower on another side , and a pocket on a third side,


These would be great for a teenager's desk, or dresser - filled with hair accessories, or makeup - If I would have had one of these as a teenager, I'm sure it would have been chucked full of makeup and sitting on the bathroom counter!
I think I will give this to my older granddaughter for her room... and I also have a couple more things to go with it....
Like this little clutch - can be for makeup, pencils, anything really.... I just need to add a Velcro fastener, and maybe another one of my button flowers?


Next up?
I guess you will have to wait until next week to find out!
Have great weekend, everyone!
Thursday, March 7, 2019
A LITTLE LEFT OVER!
So while I am still working with the old jeans - up cycling them into purses and things, I stumbled upon yet another cute little idea for some of the leftover pieces.
After I cut the straps for the purses from the legs of the jeans, I had a little bit left over on the cuff end of the leg. These were obviously skinny leg jeans, but still useful in making a couple little cute decorative snugs or holders, bowls - whatever you want to call them.
I turned the two pieces of the skinny leg jeans into little holders for my studio. But if you used a larger leg, you could make these for going around pots with plants in them, or even into little fabric baskets.

Just by adding a bit of trim, and bling, you can have a cute little accent piece for your desk, your kitchen window, your bathroom, your patio table - whatever you want to use it for.
They are simple - just cut the bottom off a leg of a pair of pants. Because these were skinny, I cut about 8" from the cuff. If I was covering a flower pot, I might start at 12".
Sew the cut end together, and box the ends by sewing across the ends of your seams,


turn your piece right side out and roll down the cuff to the length you want and embellish as you want.


I went with this in the end. And another of my little flowers!

I think we still have some pieces of jean material left - Hummmm.... What's next?
After I cut the straps for the purses from the legs of the jeans, I had a little bit left over on the cuff end of the leg. These were obviously skinny leg jeans, but still useful in making a couple little cute decorative snugs or holders, bowls - whatever you want to call them.
I turned the two pieces of the skinny leg jeans into little holders for my studio. But if you used a larger leg, you could make these for going around pots with plants in them, or even into little fabric baskets.

Just by adding a bit of trim, and bling, you can have a cute little accent piece for your desk, your kitchen window, your bathroom, your patio table - whatever you want to use it for.
They are simple - just cut the bottom off a leg of a pair of pants. Because these were skinny, I cut about 8" from the cuff. If I was covering a flower pot, I might start at 12".
Sew the cut end together, and box the ends by sewing across the ends of your seams,


turn your piece right side out and roll down the cuff to the length you want and embellish as you want.


I went with this in the end. And another of my little flowers!

I think we still have some pieces of jean material left - Hummmm.... What's next?
Wednesday, March 6, 2019
A PERSON REALLY SHOULDN'T CLEAN!
When I was cleaning through the studio, I stumbled up a bag of 4 " fabric squares. I had forgotten about the idea I had to cut all my scraps up and make a tied quilt of assorted 4" squares. I piled them beside the Elna, just to let it know I wasn't giving up without a fight.
A day or so later, I decided to try sewing the squares on the Elna. I had about 40 squares, and I managed to string piece them all in a very short time. The machine ran - not real speedy but better than it had the last time I tried. Progress!
I had been watching a lot of video's during the time I waited for the Elna to make up it's mind what it was going to do, and one of the video's was of a woman making over the shoulder purses from jeans.
Jean purses are not a new concept, and I kind of get my dander up a bit when people make video's about their creations and portray the notion that they invented the idea.
Well not in this case. My Aunt Margaret made me my first jean purse, made from the top part of pair of blue jeans in the 1980's. So it's been around awhile...
I have made some myself over the years, and I just happen to have a lot of old blue jeans in my stash - So why not?
I like to use fancier jeans for the purses, and if you hit the thrift shops, you can find a lot of really cool jeans to work with...
So I got out some jeans and started cutting out purses.
You can either use the whole bum part for a full size purse or bag, or you can cut the top of your jeans in half right beside the zipper - this way you get two smaller purses.
So you cut across the jeans at the crotch and then cut down about 1/2" from the zipper from the waist to the crotch, and the picture below is what you have when you open one side out.
Here is the first one I have been working on...
I have been doing some embellishing.. I stitched some contrast fabric behind the pocket, and I think I will also add some tiny lace along the angle opening of the pocket, just to finish it off.
I sewed a scrap of fabric on the small pocket. and added a lace flower at the bottom.
On the back I appliqued a butterfly over a piece of scrap fabric.
Purple is the accent colour on this purse.


A day or so later, I decided to try sewing the squares on the Elna. I had about 40 squares, and I managed to string piece them all in a very short time. The machine ran - not real speedy but better than it had the last time I tried. Progress!
I had been watching a lot of video's during the time I waited for the Elna to make up it's mind what it was going to do, and one of the video's was of a woman making over the shoulder purses from jeans.
Jean purses are not a new concept, and I kind of get my dander up a bit when people make video's about their creations and portray the notion that they invented the idea.
Well not in this case. My Aunt Margaret made me my first jean purse, made from the top part of pair of blue jeans in the 1980's. So it's been around awhile...
I have made some myself over the years, and I just happen to have a lot of old blue jeans in my stash - So why not?
I like to use fancier jeans for the purses, and if you hit the thrift shops, you can find a lot of really cool jeans to work with...
So I got out some jeans and started cutting out purses.
You can either use the whole bum part for a full size purse or bag, or you can cut the top of your jeans in half right beside the zipper - this way you get two smaller purses.
So you cut across the jeans at the crotch and then cut down about 1/2" from the zipper from the waist to the crotch, and the picture below is what you have when you open one side out.
Here is the first one I have been working on...
I have been doing some embellishing.. I stitched some contrast fabric behind the pocket, and I think I will also add some tiny lace along the angle opening of the pocket, just to finish it off.
I sewed a scrap of fabric on the small pocket. and added a lace flower at the bottom.
On the back I appliqued a butterfly over a piece of scrap fabric.
Purple is the accent colour on this purse.

This will be the front of the purse

and this will be the back.

I decided to add one of my button flowers on the lace flower..

I like this now.

I am toying with the idea to add a Boho tassel on the back, but not sure yet if I like it. This one is just lying on top of the piece so far.

As this purse in intended for a younger person, I still think it needs more bling!
I will probably do something at the band of the jeans, and now I have to fully line the purse, and I will be using the same material that is at the back of the front pocket, and I will add some sort of closure as well.
I use the legs of the jeans to make the strap for the purse, and this one will be an adjustable shoulder strap,
Oh - and you will never guess how I have been sewing this so far. ..
Machine sewing - on the Elna - which has decided that it likes this project much more than the wall -hanging, I guess!
You see - I have decided that I deserve a brand new computerized crafting/ quilting machine... and I have been muttering about it constantly as I have been sewing...
And it's not an idle threat...
Have a Great Day!
Tuesday, March 5, 2019
STITCHING AND - - - WELL - YOU TELL ME!
Last week I decided to go through my bags of scrap fabric with the idea of making a small wall hanging for my dining room. The walls are a terracotta colour and the colour that looks absolutely gorgeous against those walls is a dark blue, so I pulled the bag of blue scraps.
I had stitched a little saying on some muslin with blue thread, so I decided to make two crazy quilt squares in different colours of blues to attach above and below the saying to form my little wall hanging.
The two crazy quilted squares went together without a hitch, and are gorgeous. Then I got the brainwave to use my old sewing machine to do a decorative heart in blue daisies around the saying... so I did that.
Well that didn't turn out quite as I planned because the daisy embroidery stitch pulled the muslin kinda wonky.
I added my batting and backing to the piece and decided to just do a simple machine quilting, so I started on the lowest blue square - yeah - I know you are supposed to start in the middle - but in this case, nope - not happening.

About 6 rows into the quilting the Elna just quit. Lost power - Finished!
Oh boy - the squares were not the only thing blue, I can tell you! What the heck??
So I oiled the machine... nothing, I worked on it for a couple of hours, and I did manage to get it to a crawl, but that's it.
I was so frustrated because I have two machines, one the light just blew, and the other dead!
Well I showed them both - I cleaned!


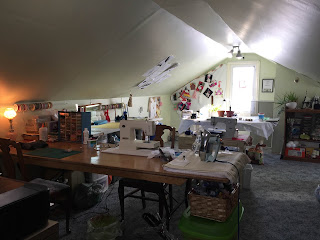
Not only did I clean - I completely tore the whole studio apart, rearranged the layout, reorganized everything -

I had stitched a little saying on some muslin with blue thread, so I decided to make two crazy quilt squares in different colours of blues to attach above and below the saying to form my little wall hanging.
The two crazy quilted squares went together without a hitch, and are gorgeous. Then I got the brainwave to use my old sewing machine to do a decorative heart in blue daisies around the saying... so I did that.
Well that didn't turn out quite as I planned because the daisy embroidery stitch pulled the muslin kinda wonky.
I added my batting and backing to the piece and decided to just do a simple machine quilting, so I started on the lowest blue square - yeah - I know you are supposed to start in the middle - but in this case, nope - not happening.

About 6 rows into the quilting the Elna just quit. Lost power - Finished!
Oh boy - the squares were not the only thing blue, I can tell you! What the heck??
So I oiled the machine... nothing, I worked on it for a couple of hours, and I did manage to get it to a crawl, but that's it.
I was so frustrated because I have two machines, one the light just blew, and the other dead!
Well I showed them both - I cleaned!


Not only did I clean - I completely tore the whole studio apart, rearranged the layout, reorganized everything -


And still the machine wouldn't run faster than a drunk snail!
So there that projects sits beside the machine.... waiting!
Monday, March 4, 2019
A CATCH-UP ON THIS THAT, AND THE OTHER THING TOO!
Here we are, another new week in a new Month. I can't seem to catch up with these weeks, no matter how hard I try!
I guess that means I have been keeping busy - and I'd say that was a good thing. The busier I am, the faster the time goes, and the sooner it becomes spring... Right?
Well it sounds good, anyway.
So what has everyone been up to? I have to tell you that I am so excited with the success of my Geranium seeds. I planted 30, and I have 28 healthy plants growing. They have pretty much all gotten to their real leaf stage, and in a week or so, I will be transplanting them in larger pots which they will stay in until they go outside.


The Pansies, did not go nearly as well. I have abut 10 plants, but they are puny at best, and none have got to the real leaf stage. I only have 1 Bee Balm up, and no Marigolds. I am counting the days until March 25th, when I will be starting my vegetables for my outside garden.
IN THE MEANTIME...
I finished my quilted eggs. My gosh they are so pretty. Take a look...


I guess that means I have been keeping busy - and I'd say that was a good thing. The busier I am, the faster the time goes, and the sooner it becomes spring... Right?
Well it sounds good, anyway.
So what has everyone been up to? I have to tell you that I am so excited with the success of my Geranium seeds. I planted 30, and I have 28 healthy plants growing. They have pretty much all gotten to their real leaf stage, and in a week or so, I will be transplanting them in larger pots which they will stay in until they go outside.

You can even see the classic red stripe beginning to happen on the leaves...

The Pansies, did not go nearly as well. I have abut 10 plants, but they are puny at best, and none have got to the real leaf stage. I only have 1 Bee Balm up, and no Marigolds. I am counting the days until March 25th, when I will be starting my vegetables for my outside garden.
IN THE MEANTIME...
I finished my quilted eggs. My gosh they are so pretty. Take a look...

I am pretty sure the Catbird who left me this nest last year would be horrified to see the eggs in it now, but I happen to think they are quite nice.
I attached ribbons to the rest of them, and instead of hanging them in my old window, like I originally thought I would, I have them hanging from twigs in a vase which is sitting on my piano.

and then I found this little sweetie for .10 at a local thrift shop and decided she needed to be on the piano as well...

How adorable is that!
I have lots to show you this week - so check in for more finished projects, and some in progress as well...
See you soon!
Subscribe to:
Posts (Atom)
-
 Last week I promised you the pattern for a knitted round dishcloth for this weeks Stash Buster Thursday. Even though I have been under the ...
 -
 Even though Gary and I are going to be alone this Christmas, we are planning a special Christmas dinner as usual. We may not have family wi...
 -
 There have been so many times in the last three years that I have had a very strong feeling of my Mother being very near. A feeling is per...